CMI Warps Feature
Args: ‘cmi setwarp [warpName] (true/false) (hand) (slot)’
Permission needed to use it: cmi.command.setwarp
Defines a list of warp for /cmi warp command.
To set the warp, you need cmi.command.warp permission.
A simple warp.
cmi setwarp test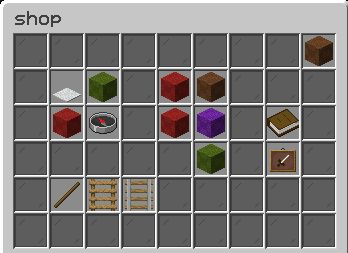
This GUI provides the option to define things like:
- Set custom item when warp GUI list is used and you have access to this warp (cmi.command.warp.[warpname])
- Set custom item when warp GUI list is uses and you don’t have access to this warp (cmi.command.warp.[warpname])
- Set permission requirement to use this warp
- Set if you want to show this warp if the player doesn’t have access to it
- Set auto lore generation (true/false) with the location where this warp leads to
- Set custom slot in GUI where you want to place it
- Set a custom page in GUI where you want to place it. So you can have multiple pages of warps and each of them is more specialized.
- Redefine warp location to where you are now
- Set warp custom display name which can be used for feedback messages while not affecting command itself
- Set warp group which allow to group multiple warps into groups and separate them while checking specific warp group in UI
- Set more than one warp location which will send the player to a random location.
- Set if multi-location warps should repeat the same location or attempt to cycle through all of them before picking the same location
Creates warp and will require cmi.command.warp.[warpname] permission node to use it. In this example cmi.command.warp.test.
cmi setwarp test trueCreates warp will take the item held in hand to display in GUI for this warp.
cmi setwarp test handCreates warp and sets GUI slot to be used in GUI (1-54).
cmi setwarp test 13All in one step.
cmi setwarp test true hand 13EXTRA
- To send another player to a warp, you need cmi.command.warp.others permission.
- You can activate BlackListedItems like spawn in config file.
- You can use warp as a condition for the Respawn option.
- You can use warp as a condition for the WarmUps option.
- You can remove the warp with cmi.command.removewarp permission. Args: ‘cmi removewarp (warpName)’.
- You can change the setting of the warp in the config file.
Warp Signs
If you want to have the option to create signs which would lead you to a specific warp point when clicking it, then you can follow this basic instruction:
Create new interactable Commands with /cmi ic new warp which will lead you to
Now to make it accessible to everyone, click on [NotPublic] which will turn into [Public] this will allow for everyone to create signs with a specific top line which will perform this interactable command.
Next, you need to decide if you want to require a permission node when players try to create this sign or not. This can allow to create vip/rank perks. If you want to enable this then simply click on [ReqPem] and players will need to have cmi.interactivesign.warp permission node. Keep in mind that this is specific permission for this specific example. You can always check requires permission node while hovering over it.
Next, you need to add the actual command you want to perform. Click on ! to get into the command editor window. Now click on [+] and enter something like asConsole! cmi warp $1 [playerName] which means that when the player clicks this sign then command from the console will be performed and we will use the first variable from the sign (ignoring the first line) and use it in place of $1 and then we will replace [playerName] with players name who actually click it. After entering the command and clicking enter you should see a result like this

Now to make it fancier and to add some customization. Go to config file and update lines into this
InteractiveCommands:
  SignRegex: (\[([a-zA-Z0-9]+)\])
Which will change the format from [ic:warp] into basic [warp] as a top sign line.
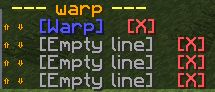
Now go back to the game and click on [EditSignLines] which will start the text editor. Click on the first line and enter something like &9[Warp] and you should see something like this as output
After all this done you can test it by placing sign and writing down lines like
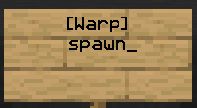
Which by itself will result into end product like this

And its all done, now you can click this sing and you will be teleported to spawn warp location.
Commands, Permissions & Placeholders
> cmi checkcommand warp
--------------------------------------------------
 /cmi warp (warpName) (playerName) (-s) (-g:[groupName]) (-p:[pageNumber])
 /cmi editwarp (warpName) (newName)
 /cmi removewarp (warpName)
 /cmi warpgroups
 /cmi importfrom [essentials/hd] [home/warp/nick/logoutlocation/money/mail]
 /cmi setwarp [warpName] (reqPermission) (hand) (slot) (autoLore) (-g:[groupName]) (world;x;y;z;yaw;pitch)
>
Permissions:
> cmi checkperm warp
 --------------------------------------------------
 cmi.command.warp.diffdisplayname - Allows to define different warp display name
 cmi.command.removewarp.bypass - Allows to remove warps which belong to anoher player
 cmi.command.setwarp.unlimited - Allows to have unlimited amount of warps
 cmi.command.setwarp - Sets warp location
 cmi.command.warp.redefine - Allows to redefine warps
 cmi.command.editwarp.others - Edit warps
 cmi.command.setwarp.[anypositivenumber] - Allows to have defined amount of warps
 cmi.command.warp.showlist - Allows to see warp list in chat or gui
 cmi.command.setwarp.multiloc - Allows to set more than one location for warp point
 cmi.command.removewarp - Remove warp
 cmi.command.warp - Teleports to warp location
 cmi.command.editwarp - Edit warps
 cmi.command.warp.[warpname] - Allows to use particular warp if warp requires permission node
 cmi.command.warp.specificlocation - Allows to define warps specific location
 cmi.command.warp.others - Teleports to warp location
 cmi.command.warpgroups - Lists warp groups
>
Placeholders:
There are no relative placeholders