

Introduction
As of 9.6.2.0 version holograms will default to new improved look for 1.20+ servers. Most examples will be made for this new system.
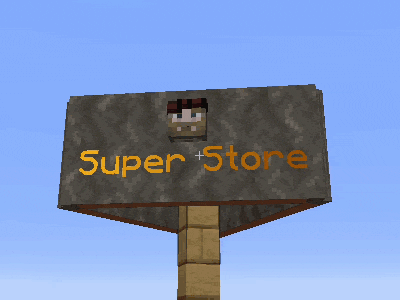
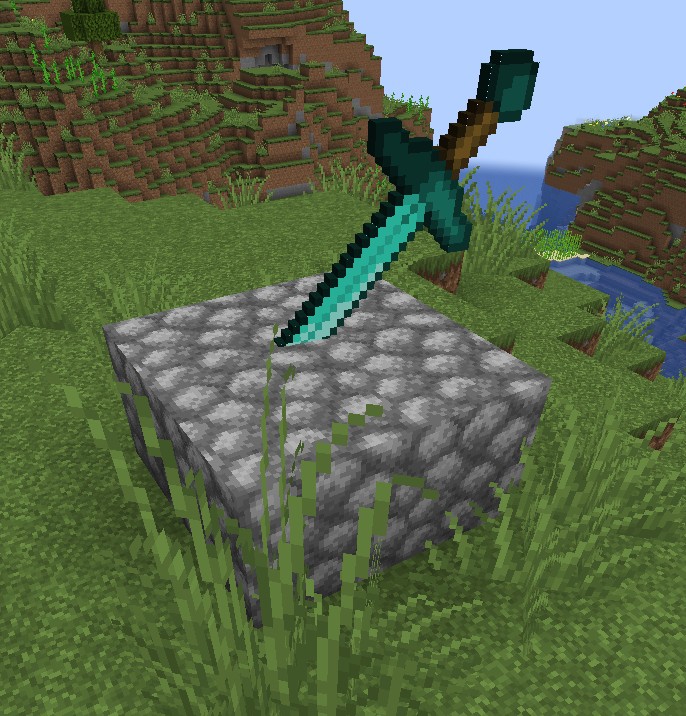
The CMI hologram feature provides you the opportunity to holographically show text or icon.
You can even create clickable holograms to perform any command as the player or as the console.
It’s all packet-based and items only exist client side, which protects them from being removed by third-party plugins.
The in-game editor allows you to add, edit and remove lines. Make the hologram clickable, relocate the hologram to your position, and adjust the hologram’s position. Change the activation range, update range, and more.
PlaceholderAPI is supported, allowing you to display information from other plugins inside of holograms. It can show different information for separate players. Placeholders such as %cmi_user_name% can be used when creating lines. The full list can be found at zrips.net/cmi/placeholders
Holograms can have multiple pages which can be shown when necessary. You can find examples on this page of how to set them up.
A hologram’s lines can be updated at certain intervals based on your need and potentially saving server resources when rapid updates are not needed.
It will hide if you move too far away to minimize load on client and will update only when players are near it.
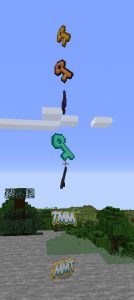
Icons can be used in a hologram’s lines for further customization.
Holograms can be hidden if the player can’t directly see them. This will help to minimize the client’s TPS loss (due to the poor handling by Minecraft), as players will not see holograms that are behind a wall or on another floor.
Examples

Main window
Animation window
Location modifications
Interactions
Creating a Hologram
To create a new hologram, use /cmi hologram new [name]. For example, to create a new hologram called head, the command would be/cmi hologram new head. Optionally you can simply perform /cmi hologram and then click on [+] to start new hologram creation process.
Now you can add lines to the hologram by clicking on the green [+] sign, and entering what to show as a line in the chat. This will define each line in a hologram. Alternatively you can look at hologram and perform /cmi hologram aimlines to quickly open line editor for the hologram you are looking at
To adjust the hologram’s settings, click on <Open settings GUI>. This will allow you to make changes such as: update rate, update range, make it clickable, or even move to a new location. Alternatively you can perform /cmi hologram aimgui while looking at hologram you want to edit
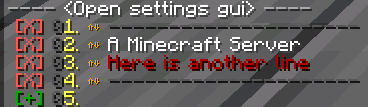
To check the list of all holograms, simply write /cmi hologram and you will get a list sorted by distance from your current location. Meaning the closest ones to you will be on top of the list. You can click on the desired hologram name to start editing it.
ICON:[value]
You can only have one icon on a single line.
Floating icons only for servers with version 1.10+ and above. Using new display method (1.20+ servers) both ICON and SICON will result in same static icon.
The base syntax is: ICON:[itemName/id]:[data]
Examples:ICON:stone will create a floating Stone icon, while ICON:stone:3 will show a floating Diorite. ICON:head:[playerName] will show a specific player’s head.ICON:head:%cmi_user_name% will show the head of the player who is looking at the hologram.ICON:head:base64 will show the head of the custom base64 skin from sites like minecraft-heads.com, etc. (the really long string if characters).ICON:Stone%enchanted% will show an enchanted icon, add %enchanted% to the back of your current syntax. The same applies to glowing icons, just replace %enchanted% with %glowing%. ICON:Stone-64 will show a stack of items can be shown by using a - and specifying the amount.ICON:%itemInHand% can be used to show the player’s item in hand as an icon.
To show an icon with custom model data, add %customModelData:[id]% to the back of your syntax, like this: ICON:bow%customModelData:4%. Using this format, you can achieve something like:
ICON:materialName%customModelData:[id]% will show an icon with custom model data, add %customModelData:[id]% to the back of your current syntax. Using this format, you can achieve something like: ICON:bow%customModelData:4%
SICON:[value]
Defines a static icon that doesn’t float up or down.
Static icons use the same syntax as floating icons. The difference is that the base variable is SICON instead of ICON.
Hologram Boards
As of 9.8.6.0 version holograms can have Board which will produce backing for the hologram
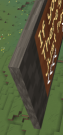
This can introduce some thickness to the hologram. Generally any block can be used here and oriented in general ways, like scaling, offset and rotation. Keep in mind that rotation is limited to 90 degrees to each side on all axis. Increasing thickness of the board will shift text forwards, this effects interaction plane too, but only does it for the front side
Animations
Holograms can have two primary animations, one is fadein/fadeout and secondary is automatic rotation around its axis.
Fadein/fadeout is defined in amount of ticks it should take to appear or go away, by default this is instant, while setting to something like 5 ticks you can have effect like this
While effect is small it can add extra smoothness for when holograms appear for players instead of being instant.
Rotation around its axis will allow to have automatically rotating holograms like this
Tho keep in mind that this particular example is not a special feature, but simply 3 duplicated holograms with 120 degree different yaw offset creating this illusion. Rotation happens on holograms origin point, but you can offset entire hologram creating illusion of it rotating around completely different point
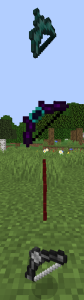
Clickable holograms
By default, holograms are not clickable. You’ll need to enable it in the GUI for each hologram by clicking on the Stick icon.
You can then define commands to be performed by clicking on the Bow icon. Specialized commands are supported. Keep in mind that this will define commands to be performed when clicking anywhere on hologram interaction area. To have more accurate commands based on where player clicked you will need to utilize CText format, so hologram line should look something like <T>Click Me</T><C>cmi heal [playerName]</C> which will perform defined command when player clicks this specific text. This will override defined global commands and will only perform defined commands in CText if player clicks on it, otherwise global commands will be triggered. You can use more than one clickable text per line, simply duplicate input <T>Heal Me!</T><C>cmi heal [playerName]</C><T> Feed Me!</T><C>cmi feed [playerName]</C> to take into consideration when using CText in holograms is that text width is being guesstimated, meaning that we don’t really know exact boundaries of the text on client side, as this is based on their resource pack and their used Font which could misalign detection. Default detection is based on default minecraft font, you can still adjust detection area with included GUI, so make sure that marked detection area (blue dots) fully covers entire text from edge to edge for best and most accurate detection. This should include entire text and not only clickable part, plugin should automatically more or less accurately detect its area based on the text, but if you have placeholders then it might not be fully accurate, so adjust as needed.
Side note to remember, as entire detection is based on player look direction and players location, there can be noticeable delay between you moving your camera around and hologram reflecting it, which can be around 0.25sec, which isn’t much but can make it look laggy while its just due to how game works in general and we can’t really do much about it
You can toggle the special particles that will be shown when a player clicks on a hologram by clicking on the Paper icon. Particles are enabled by default.
Hovering Effect
As of CMI version 9.1.2.x, the plugin can detect players hovering over holograms and create particle effects or change the text of the line that the player is looking at.
The hover-over effect follows the same format used in custom text, with a few limitations.
The text, hover and command variables can be used, and with specialized command support, it provides a full range of features.
The following variables are recognized:
<T>Text</T> – Defines text which will be shown
<H>Hover-over text</H> – Defines text which will be shown when hovering over the line.
<C>cmi heal</C> – Defines command(s) to be performed from the console when clicking this line.
If you have CText with command and avoid including hover part, then we will automatically include different colorizations (can be changed in GUI) for plain text and when hovered, this only works when provided CText includes command, while if you only want to have different hover effect without triggering command you will need to define it manually
You can create something like this example:
<T>{#gray>}Free heal{#edward<}</T><H>{#edward>}&lFree heal{#gray<}</H><C>asConsole! gcooldown:3?! cmi heal [playerName]</C>Multiple commands can be used by separating each one with ;;
You can still have a command that is performed when a player clicks on any of the hologram’s lines, while also having a different one if the player clicks on a specific line.
The hover particles can be disabled by clicking on the Green Carpet icon in the hologram’s settings GUI.
The type of particles can be changed by clicking on the icon below it.
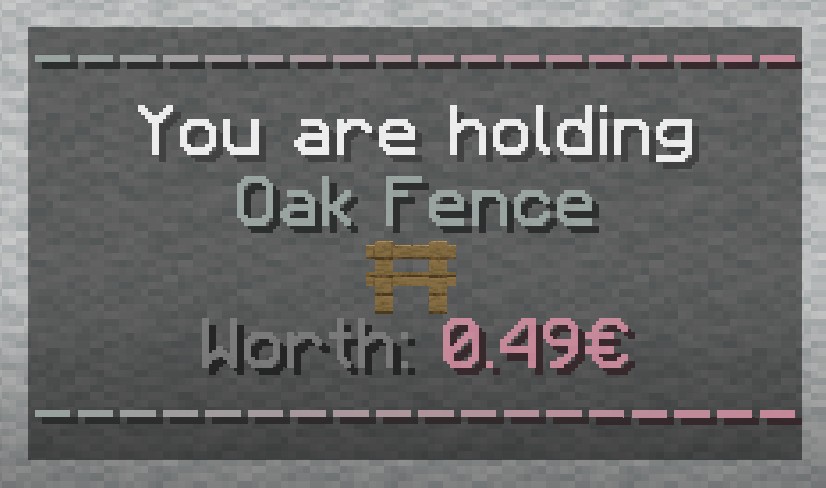
To change the number of hover particles shown, click on the Oak Fence icon.
The extra height, width and offset of the particles can be changed by clicking on the Brick Wall and Stone Brick Wall icons.
Interaction area can be adjusted by changing its size and actual relative location. Keep in mind that if you are using double sided hologram with Board enabled, then introduced thickness might cause back side incorrectly detecting hovering location, as we are only checking single plane for efficiency sake, so either use thin boards or avoid having clickable double sided ones with thicker ones.
Creating pages
By default, all the text goes into one page.
To create another page, simply insert a new line with the text !nextpage!.
The player will only see the first page (up until the first !nextpage!).
Performing /cmi hologrampages [holoName] (playerName) (next/prev/[pageNumber]) will change what page the player is viewing.
Keep in mind that each player sees their own page.
You can have as many pages as you desire, however it may be harder to manage them through the in-game editor as there is a limit to how many lines it can show at once.
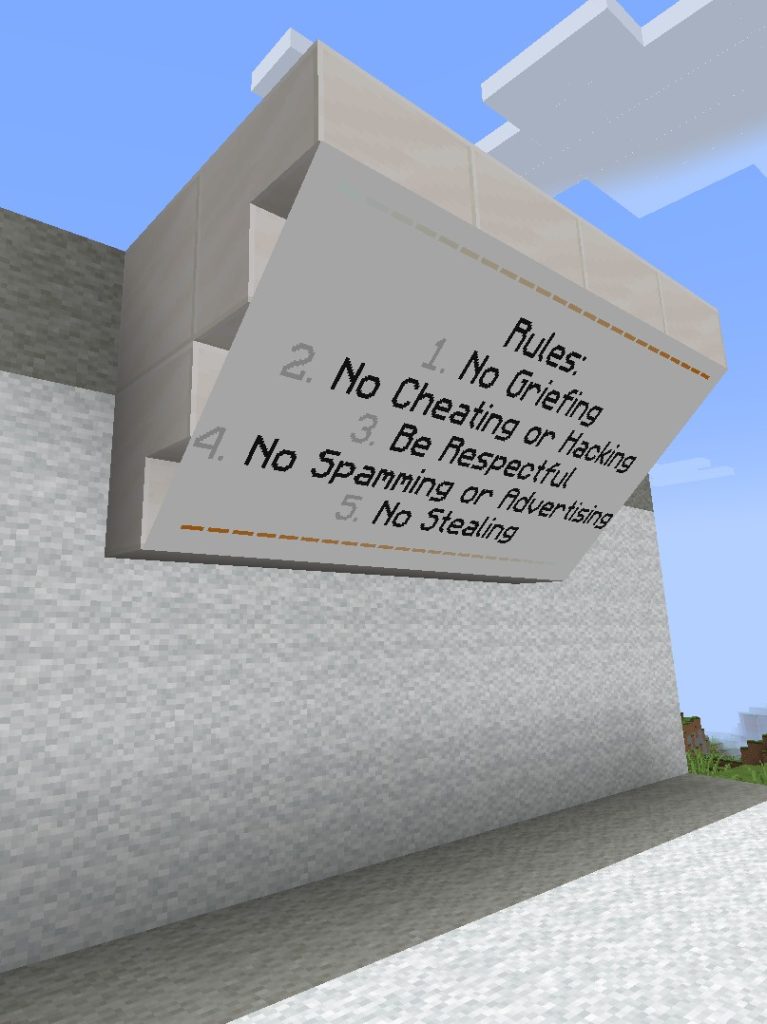
As an example, let’s create a hologram called Rules and add the following lines:
Line 1
Line 2
Line 3
!nextpage!
Line 4
Line 5
Next, open the settings GUI by clicking on <Open settings GUI> text in the chat. Then make your hologram interactable by clicking on the stick icon, and then click on the Book icon to enable automatic pagination buttons which will be including at the bottom of hologram, which will navigate between the hologram’s pages when a player clicks on them. Alternatively you can create your own navigation buttons by creating lines with text in them like <T><<<< </T><C>[prevPage]</C><T> >>>></T><C>[nextPage]</C> in this case [prevPage] and [nextPage] are special variables which will trigger page change of this particular hologram when clicked
Click Types
There are 5 click types that can be used when you have an interactable hologram:
click:left! – The command will only be performed if the player left clicks and is not sneaking.
For example: click:left! cmi heal [playerName].
click:leftshift! – The command will only be performed if the player left clicks and is sneaking.
click:right! – The command will only be performed if the player right-clicks and is not sneaking.
For example: click:right! cmi feed [playerName].
click:shiftright! – The command will only be performed if the player right-clicks and is sneaking.
None of the above – Any click type will trigger the command.
Other settings
For 1.20+ servers
Display method – 1.20+ servers will default to the new display method. Older ones will have to use the outdated method. 1.20+ servers can choose a new one or the old one, but it’s strongly recommended to go with modern, which is more efficient for server and client. Alternatively you can give cmi.hologram.seeold permission node to player for him to see old type holograms, useful in case you have server with older clients which can’t handle modern holograms, but you have to keep in mind that old holograms are way more limited and you should avoid changing scaling, offsets and so on, as those will not have same effect on old type holograms. By default new and old type holograms should match their sizes
Enabled – hologram can be disabled in case you no longer want it to be shown to the players. Alternatively enabling permission requirement to see it could be used to hide it for everyone else while still allowing for staff or particular players to see and interact with one
Follow type – Fixed, Vertical, Horizontal, Center. When in vertical mode, the hologram will always face the player while rotating on Y axis. The fixed position will always face the same side, which can be modified or animated. Horizontal will track player on X axis. Centered will always face player
Double sided – Only available when the Follow type is set to fixed or horizontal. This will create the back side of the hologram, which will be visible from both sides.
Text alignment – Center, Left, Right.
Text shadow – Enables or disables shadow for the text
Text Alpha – Value between 0 and 255 to define the transparency of text.
Text width – Width of the text before auto wrapping, if you have interactable holograms then avoid text lines going into new line as it can mess interaction detection
Text filler – Defines line width to be filled in with spaces to reach it. This can help out in aligning text to two sides for things like top lists. Use %filler% in your hologram lines to automatically fill in with spaces to reach desired width
Text seethrough – enables ability to see hologram text from behind blocks. This only works on text portion. If combined with Board then you can have text which is not visible until you look at it from behind block
Light levels – Lighting of hologram, can override general light levels in the world. Setting it at -1 will make it auto-adjust.
Background color – The base color of the background
Background alpha – Transparency of background. A value between 0 and 255
Base offset, direction, scale – Defines general hologram position, scale and direction, this will effect board, text and icons at same time
Board enabling – will create board like block behind hologram to serve as backing for it. Recommended to set background alpha to 0 when enabling board for best looking results
Board scale, direction and offset – effects position, scale and direction of the board. This is independent from remaining hologram elements
Board material – can be any block type material
Icon scale, direction and offset – effects all icons on hologram equally
For armor stand based holograms
Line of sight – Defines if hologram should disappear when behind a block, only applies to old holograms
Location and Range Page
Update range – Defines the range, in blocks, that a player must be within for the hologram’s lines to update. This is based on spherical range from hologram origin point
Show range – Defines the range, in blocks, that a player must be within for the hologram’s lines to appear. This is based on spherical range from hologram origin point
Permission required – Defines whether players should require the cmi.hologram.[hologramname] permission node to see the hologram.
Tip: You can use &u to make the line a random color that changes every update.
Interaction Page
Hologram interactions are disabled by default and should only be enabled if interaction with hologram is needed
Show hover particles – Enables or disables particles going around interactable hologram. This is mainly to help out in visual indicator when player hovers hologram he could click on
Particles – amount of particles to be spawned, by default particle will go clock wise around hologram, if more than one is defined then all of them will be equally spaced around holograms perimeter
Particle type – can have any particle with custom options, picked from special GUI editor
Particle spacing – particles are being spawned every tick and will shift po defined amount around perimeter. Can have negative values to make them “move” backwards
Particle scale and offset – will define plane where particles should be shown, this is independent of interaction plane and will allow you to more accurately adjust particles path based on your needs
Enable pagination buttons – will automatically include pagination buttons at the bottom of hologram allowing you to switch between hologram pages with simple click. This only works if hologram has more than one page
Commands – defines global hologram commands when clicked on it at any place
Show particles – shows or hides particles when you click on holograms, this only effects global commands and not CText ones, those use particle preset from config file
Interaction size and offset – when editing you should see few blue dots indicating interaction area, if area isn’t correct being detected automatically you can adjust it to properly fit existing text. Bounds should include text portion from edge to edge and not more, this will allow for hover detection to be more accurate, especially if using CText clickable line portions
Base and Hover prefix – color codes used when having CText line with a command, this will automatically include defined color codes in front of clickable text and for it when its hovered, simplifying setup of clickable portions which should only change color when hovered
Animations Page
Page change interval – Defines the interval, in seconds, to change the hologram’s pages automatically. In case player changes page manually then this will skip change cycle
Update interval – Defines the interval, in seconds, to update the hologram’s lines. If you have static text, set the update interval to 0. Interactable holograms can bypass this interval and will update text if needed independent of actual update interval
Auto rotate – defines amount in degrees yaw angle should change every tick, can be set to negative value to get it rotate counter clockwise
Fade In – amount of ticks it should take to show hologram, higher number will make hologram to appear slower while setting it to 0 will make it appear instantly
Fade out – same as fade in, just for fading out
Images and Animations
As of CMI version 9.0.2.0, you can add images or create simple animations with the help of holograms.
Keep in mind that transparent pixels will be filled with _| to keep appropriate spacing for each line
To add an image you will need to use one of the following formats:
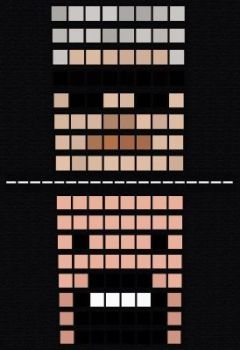
img:helmet:[playerName], which will show a player’s head with the overlay. For example: img:helmet:Zrips It is currently not possible to use dynamic player names.
img:head:[playerName], which will show a player’s head without the overlay. For example: img:head:Zrips It is currently not possible to use dynamic player names.
The last option is to provide a direct image path from the CMI/Images folder, for example img:diamond.png
Not all images are in the size you want them to be. To resize the image, you can add 2 extra variables.
To set the image’s height to 12 pixels, you can use img:diamond.png 12, while the width will be automatically scaled up/down depending on the size of the original image.
You can define both sizes using img:diamond.png 6 6, which will keep the image at a 6×6 size, regardless of the size of the original image.
In case you want to set the width, but scale the height automatically, you can use 0. img:diamond.png 0 9 will set the image’s width to 9 pixels and scale the height automatically depending on the size of the original image.
By default, the image will be 8 pixels high if not defined.
Basic example of Nyan cat:
  PageInterval: 0.1
  Range: 46
  RangeExtra: 46
  Spacing: 0.25
  SpacingIcon: 0.5
  Lines:
  - img:nian/0.gif 32
  - '!nextpage!'
  - img:nian/1.gif 32
  - '!nextpage!'
  - img:nian/2.gif 32
  - '!nextpage!'
  - img:nian/3.gif 32
  - '!nextpage!'
  - img:nian/4.gif 32
  - '!nextpage!'
  - img:nian/5.gif 32
The compressed RAR file can be downloaded from here
NOTE! Avoid creating holograms that are bigger than 100 lines if using old armor stand method. The server can handle bigger and even animated ones, but the client can’t.
Editing or deleting a Hologram
You can type: /cmi hologram, this will list the holograms in order of ‘nearby you‘.
You can delete a hologram by pressing the red X in front of it. There’s no undo for this.
To edit a hologram you can click on the name to open its settings. Once you’ve done so, at the top there will be the text “<Open settings GUI>“, you can click this. Then the list of lines for that hologram is listed below it. You can click on a line to edit it. Or press the red X in front of it to delete it.
Convenient commands
/cmi hologram aimgui – opens hologram gui you are looking at
/cmi hologram aimlines – opens hologram lines editor you are looking at
/cmi hologram lastgui – opens hologram gui of the last hologram you were editing
/cmi hologram lastlines – opens hologram line editor you were editing
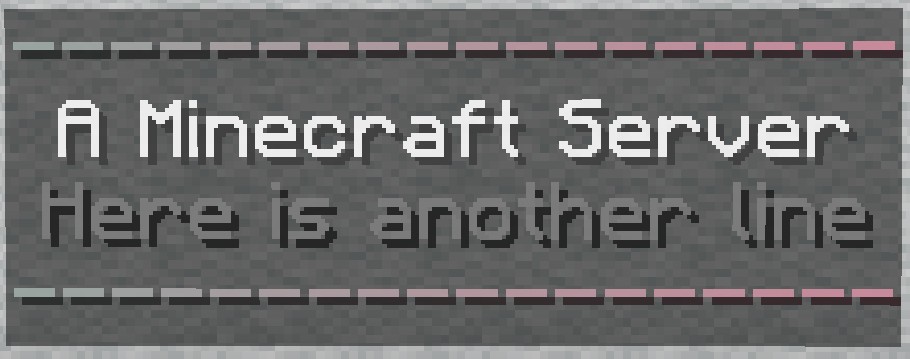
Save File Examples
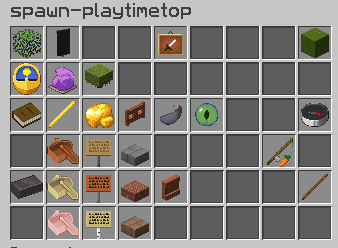
Top playtime
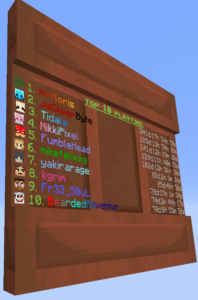
topplaytime:
Loc: LT_Craft;457.9;156.22;996.6
Board:
Enabled: true
Dimensions: 4;2.8;1.21
Material: ACACIA_SHELF
Direction: 180;0;0
Offset: 0;0;0.98
Text:
Shadow: false
BAlpha: 0
Settings:
Interval: 600
Lines:
- '{#73C144}&l&nᴛᴏᴘ 10 ᴘʟᴀʏᴛɪᴍᴇ'
- <head:%cmi_playtimetop_cname_1%:false> {#73C144}1. {#E7E7E7}%cmi_playtimetop_name_1%%filler%&r
{#E7E7E7}%cmi_playtimetop_time_1%
- <head:%cmi_playtimetop_cname_2%:false> {#73C144}2. {#E7E7E7}%cmi_playtimetop_name_2%%filler%&r
{#E7E7E7}%cmi_playtimetop_time_2%
- <head:%cmi_playtimetop_cname_3%:false> {#73C144}3. {#E7E7E7}%cmi_playtimetop_name_3%%filler%&r
{#E7E7E7}%cmi_playtimetop_time_3%
- <head:%cmi_playtimetop_cname_4%:false> {#73C144}4. {#E7E7E7}%cmi_playtimetop_name_4%%filler%&r
{#E7E7E7}%cmi_playtimetop_time_4%
- <head:%cmi_playtimetop_cname_5%:false> {#73C144}5. {#E7E7E7}%cmi_playtimetop_name_5%%filler%&r
{#E7E7E7}%cmi_playtimetop_time_5%
- <head:%cmi_playtimetop_cname_6%:false> {#73C144}6. {#E7E7E7}%cmi_playtimetop_name_6%%filler%&r
{#E7E7E7}%cmi_playtimetop_time_6%
- <head:%cmi_playtimetop_cname_7%:false> {#73C144}7. {#E7E7E7}%cmi_playtimetop_name_7%%filler%&r
{#E7E7E7}%cmi_playtimetop_time_7%
- <head:%cmi_playtimetop_cname_8%:false> {#73C144}8. {#E7E7E7}%cmi_playtimetop_name_8%%filler%&r
{#E7E7E7}%cmi_playtimetop_time_8%
- <head:%cmi_playtimetop_cname_9%:false> {#73C144}9. {#E7E7E7}%cmi_playtimetop_name_9%%filler%&r
{#E7E7E7}%cmi_playtimetop_time_9%
- <head:%cmi_playtimetop_cname_10%:true> {#73C144}10. {#E7E7E7}%cmi_playtimetop_name_10%%filler%&r
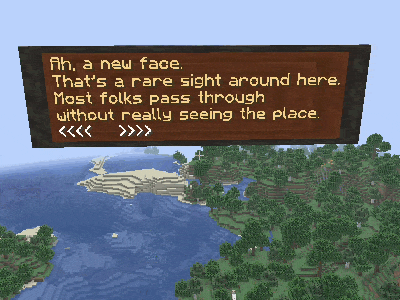
{#E7E7E7}%cmi_playtimetop_time_10% Multi page example

holopages:
Loc: LT_Craft;474.34;153.9;989.9
Board:
Enabled: true
Dimensions: 0.82;0.12;0.04
Direction: 90;0;0
Interaction:
Particle:
Spacing: 0.04
Effect: Trail;8;{#FFFFFF}
Count: 6
Dimension: 0.28;0.02
HoverPrefix: '&7&n'
Enabled: true
Dimension: 0.33;0.01
Animation:
In: 5
Out: 5
Text:
Align: LEFT
BAlpha: 0
Double: true
Page:
Auto: true
Settings:
Dir: 0;90;0
Range:
Visual: 16
Lines:
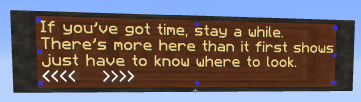
- '{#f7d486}Ah, a new face.'
- '{#f7d486}That’s a rare sight around here.'
- '{#f7d486}Most folks pass through'
- '{#f7d486}without really seeing the place.'
- '!nextpage!'
- '{#f7d486}If you’ve got time, stay a while.'
- '{#f7d486}There’s more here than it first shows'
- '{#f7d486}just have to know where to look.' Worth display and selling by clicking on hologram
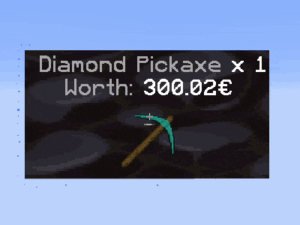
Worth:
Loc: LT_Craft;444.12;154.24;995.73
Board:
Enabled: true
Dimensions: 0.8;0.7;0.01
Material: BLACKSTONE
Offset: 0;-0.31;0
Interaction:
Particle:
Effect: Dolphin
Commands:
- asConsole! cmi sell hand [playerName]
Enabled: true
Dimension: 0.95;1.38
Offset: 0.95;1.38
Text:
Shadow: false
BAlpha: 0
Double: true
Icon:
Scale: 1.5;1.5;2
Offset: 0;-0.32;0
Settings:
Scale: 1.1;1.1
Range:
Update: 16
Visual: 16
Interval: 1
Lines:
- '&r {#gray} %cmi_iteminhand_displayname% {#white}x %cmi_iteminhand_amount% &r'
- '{#gray}Worth:{#white} %cmi_iteminhand_worth%'
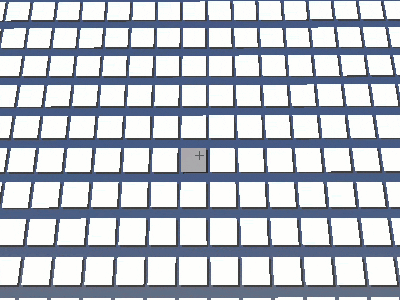
- ICON:%iteminhand% Hover detection test
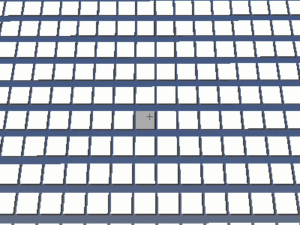
grid:
  Loc: LT_Craft;430.08;153.72;995.43
  Interaction:
    Enabled: true
    Dimension: 0.21;0
  Lines:
  - <T>⬛</T><C>cmi heal</C><T>⬛</T><C>cmi heal</C><T>⬛</T><C>cmi heal</C><T>⬛</T><C>cmi
    heal</C><T>⬛</T><C>cmi heal</C><T>⬛</T><C>cmi heal</C><T>⬛</T><C>cmi heal</C><T>⬛</T><C>cmi
    heal</C><T>⬛</T><C>cmi heal</C><T>⬛</T><C>cmi heal</C><T>⬛</T><C>cmi heal</C><T>⬛</T><C>cmi
    heal</C><T>⬛</T><C>cmi heal</C><T>⬛</T><C>cmi heal</C><T>⬛</T><C>cmi heal</C><T>⬛</T><C>cmi
    heal</C><T>⬛</T><C>cmi heal</C>