The CMI portals feature allows you to create portals that execute commands when a player walks through them.

Portals support specialized commands.

A portal doesn’t require a teleport-endpoint. You can depend on commands. When you create a new portal it expects you to select an area first. A portal can display a one of a variety of particles, but showing particles is not required. There is BungeeCord support, you can set the teleport-endpoint on a remote server within the same network.

Creating a new Portal

To create a portal, you will need a Wooden Shovel (the default CMI selection tool), as well as the cmi.command.portals and cmi.select permission nodes.

1. Select the area where you want the portal to be. The selected area will be marked with particles.

2. Once the area has been selected, we can create a new portal using /cmi portals new [portalName].
Example: To create a portal named Test1, the command would be /cmi portals new Test1.

3. Optionally, you can set the portal’s destination point. The chat will have a clickable message.

4. Next, you can type /cmi portals edit Test1 to edit the portal’s settings through a GUI. From where you can:
  • Enable/disable the portal.
  • Enable/disable showing particles.
  • Change the particle type.
  • Change the amount of particles.
  • Change the percentage of sides shrunk particles.
  • Change the range, in blocks, that a player must be within for the particles to activate.
  • Show the particles to players without the cmi.command.portal.[portalname] permission node.
  • Change the particle’s colors (only for red dust particles).
  • Change the particle size (only for red dust particles).
  • Perform the portal’s commands without a valid teleport location.
  • Edit the portal’s commands.
  • Change whether players should require the cmi.command.portal.[portalname] permission node to use the portal.
  • Inform players if they don’t have the cmi.command.portal.[portalname] permission node.
  • Prevent players without the cmi.command.portal.[portalname] permission node from using the portal.
  • Set the portal’s safe outside location.
  • Set the portal’s teleport location.
  • Teleport to the portal’s target location.
  • Teleport to the portal’s location.
  • Redefine the portal’s area from your current selection.
  • Remove the portal.

5. Now, let’s see how to add commands. Click on the Enchanted Book item in the GUI.

6. Click on the green [+]-sign to add a new command and type it into the chat. (Specialized commands are supported.)

Don’t start the command with / (forward slash).

The [playerName] variable can be used to include the name of the player who interacted with the portal. 

7. As an example, the following command has been added:

8. You are now done. You have a working portal that will give a player Blindness effect and removes their flight when they go through it.

You can also remove the Blindness effect by clicking on the red [X] button.

9. Here’s how a portal is saved in the ~/plugins/CMI/Saves/Portals.yml file. 

  Test1:
    Loc: 358.0:64.0:77.0:358.0:67.0:81.0
    enabled: true
    effect: reddust
    color: 8224125
    showParticles: true
    Tp: world;-979.5;82.0;544.5;90.3;2.4
    kickBack: true
    particlesByPermission: false
    requiresPerm: false
    informOnMissingPerm: false
    particleAmount: 20
    particleHide: 0
    activationRange: 16
    commandsWithoutTp: true
    commands:
    - cmi effect [playerName] blindness 2 1 -s
    - cmi fly [playerName] false​

Attention

In the CMI config.yml file you can configure the commands assigned to all portals, the default is cmi effect [playerName] blindness 2 1 -s

If you want to remove it, just replace it with none.

Portals:
  # Defines in milliseconds how often to check if player entered portal or not
  # Bigger numbers can help slightly lower server load but small portals, 1 block depth without back wall can be passed through without teleportations if player moves fast enought
  CheckInterval: 300
  # Defines in milliseconds how often to check if player entered portal range for particles to apear
  CheckParticleInterval: 500
  Defaults:
    # Should we perform commands without set destination location by default
    # This only effects newly created portal areas
    # When set to true at moment you create portal you can enter it and commands defined belove will be performed without teleporting you anywhere
    # This can be change for each portal independently with ingame portal editor
    PerformCommands: true
    # Commands to be performed on teleport event
    Commands:
    - cmi effect [playerName] blindness 2 1 -s

Extra

  • Portals will work over a BungeeCord network and you can teleport players across your servers. To set one up, create a portal, open the GUI, and click on the location button. You should then get a message in the chat. Go to the desired server, which should also have CMI installed, and click on the message. You are done. The portal will now teleport players to the specified server when they walk through it. Don’t forget to put the CMI-Bungee jar on the BungeeCord proxy server.

  • Portal commands will work across your BungeeCord network and are performed after the player has been teleported.
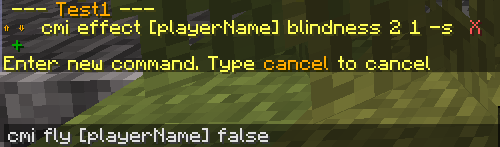
  • You can play a sound when a player enters the portal by adding the following to the portal’s commands section:
    Note: Sound names can be different based on your Minecraft version.
  • You can see all portals, in order of proximity, typing /cmi portals.
  • You can add as many commands to a portal as you want, and specialized commands can also be used.
  • Portals can be forcibly updated using /cmi portals forceupdate [portalName].
  • Portals can be enabled or disabled using /cmi portals enabled [portalName] [true/false].

Commands, Permissions, & Placeholders


Commands:
> cmi checkcommand portal
/cmi portals (new/nearest/forceupdate/setlocation/enabled) (portalName) (world:x:y:z:yaw:pitch)
>
Permissions:
> cmi checkperm portal
cmi.command.portal.[portalname] - Allows to use portal
cmi.command.portals - Set portals
cmi.select - Visualize selection before creating a portal
>
Placeholders:
No relative placeholders for portals