
The custom text (ctext) feature allows you to create any text you would like to show to the player. It can be simple plain colorized text or complex hover-over and clickable text.
- PlaceholderAPI support for automatic replacement of placeholders. Allows for custom text by each player.
- If you have used EssentialsX’s customText feature where you can set some custom text to be shown when performing some particular command, then this is the same thing, just like 10x more customizable and more powerful.
- First. Each command is separated into separate files for simpler control of what you want to use or have.
- Next. You can define where the new page starts by simply clicking on it in the chat window instead of counting 7 lines… So you can have pages with 100 lines or with 1, your decision.
- Third. It includes automatic pagination, so if you have more than one page of custom text, you will automatically get the option to press on next page button to see the next page. This can be disabled for each custom text separately if you don’t want to have it for some reason.
- Fourth. It automatically includes new custom text as a new command with the same name. For example, default file rules will have /rules command which will show a rules list when performing it. Official command is
/cmi ctext [ctextName] (playerName) (page) - Fifth. You can create raw messages. What are raw messages? Messages where you can hover over to see more info, you can click it to perform the command, you can click it to get some text being pasted in chat. Creation is quite simple:
<T>Your visible Text</T><H>The Hover-over text</H><SC>Suggested Text when you click on it</SC>
Sidenote: You can use this in the CMI ctellraw command as well.
<T>Text</T> - Defines text which will be shown
<H>Hover text</H> - represent text to be shown when hovering over text
<C>cmi heal</C> - represents command to be performed when clicking text. Performed by player.
<CC>cmi heal [playerName]</CC> - represents command (from console) to be performed when clicking text. Player can click this only once.
<CCI>cmi heal [playerName]</CCI> - represents command (from console) to be performed when clicking text. Player can click this as many times as he wants.
<SC>Suggested text</SC> - is replacement for command and it will paste text into chat field when clicked
<SI>Insertion text</SI> - differently than <SC> will not replace text but will add to existing one when shift+clicked
<URL>www.google.com</URL> - add url link
To have more than one raw message in one line separate them with <Next>
Raw message should always start with <T>
- Sixth. All this can be edited INGAME with
/cmi editctext. You can create new customTexts, edits its lines, add new pages, remove old ones, and enable/disable alias or automatic pagination (see legend below for details). Change line order by simply clicking on special arrows. In other words, there is full support to fully create and control custom texts in-game without needing to edit them throw files directly. So any admin/staff can edit or create nice-looking help pages without direct access to your server files. - This feature will help you to create your own help pages, for your own particular server, with special clickable lines or extra info when hovering over them and having all this under a simple alias system.
- And this feature is being used to convert custom text into a book with
/cmi getbook [cTextName] (playerName)which includes all hover-over and clickable messages into it automatically
Let’s say you want to create a text line like “Hello there!” which can be hovered over and shows “Hi!” and when clicked heals the player once. That would be
<T>Hello There!</T><H>Hi!</H><CC>cmi heal [playerName]</CC>
Let’s say you want to have multiple text sections on one line which can be hovered over. This can simply be achieved by repeating it and the next section will be indicated by the same variable
<T>Section One</T><H>Hover for section one<H><SC>Suggested text</SC><Next><T>Second section</T><Next><T>Third section</T><H>With hover message</H>
Color codes in regular format are acceptable.
Images
In case you want to add an image like a player’s head with some text on the side, you can utilize the image feature as of the 9.0.2.0 version. Only for 1.16+ servers for time being.
For example, you can achieve shown result above by using this setup inside of your custom text file.
<AutoPage>
------------------------------------------
img:helmet:[playerName] 8
imgtext:
imgtext:
imgtext: {#gray}Welcome %cmi_user_display_name%{#gray}!
imgtext: <T>{#gray}Money balance: &f%cmi_user_balance_formatted%</T><H>{#green}Click</H><C>cmi balance</C>
imgtext: <T>{#gray}Mail: &f%cmi_user_mail_count% </T><H>{#green}Check mail</H><C>cmi mail</C><T>{#gray}Warnings: &f%cmi_user_warning_count%</T>
------------------------------------------
As you can see you can have text before and after the image while at the same time on side of it. Text on the side needs to be defined with imgtext: variable straight after img: otherwise it will not be recognized. You can have multiple images if needed.
Image can be defined like img:head:[playerName] which will use player’s skin head image. This only shows base skin.
If used img:helmet:[playerName] then players’ skin with helmet layer will be shown.
The last option is to use a real image from a local file as img:diamond.png while the file needs to be located inside the ~/plugins/CMI/Images folder
Image size defaults to 8 pixel height if not defined otherwise, this is basic protection from trying to show 4k images. You can resize image by providing its dimensions like img:diamond.png 8 10 which will produce 8×10 pixel image independent of how big is the original one. Both variables are optional and if only one is provided then the second one will be automatically scaled to keep the original ratio. The first variable defines the height and the second width. If you want to provide only fixed width then define a height as 0, like img:diamond.png 0 12 in which case we will scale height depending on the original image while always keeping 12 pixel width.
Optionally you can add hover-over type messages or even clickable ones for a nice and compact look
.txt pagination
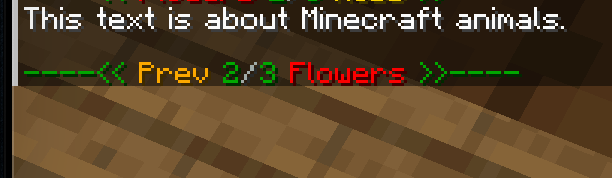
<AutoPage> at the top on the first line, and then at every location you wish to have a page break, use, in-game it will show with automatic page numbers and <pref | next > buttons.
Since CMI version 9.3.2.0 you can customize how these look by adding right below, on a new line, the following: <pageLabel:Something> (which will change Next to Something)
This will support (hex) color codes.
For example,
This is text on page one.
<NextPage>
<pageLabel:{#gold}Mobs>
This text is about Minecraft animals.
<NextPage>
<pageLabel:{#gold}Flowers>
You can find flowers in many different biome types.
And this will look like this: 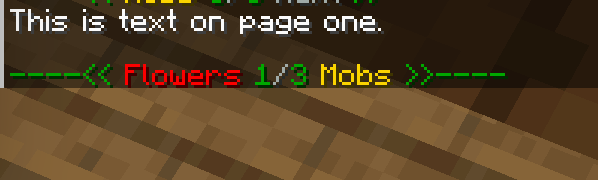
.txt legend
To avoid mistakes, it’s advised to use the ingame editor via/cmi editctext.
However, if you must, you can edit the .txt files in the CustomText/ folder directly. You might notice some special tags being added on the first line and perhaps throughout the document. These are toggle via the in-game editor of course, but the legend below will explain what they do.
If you do add, delete or edit a .txt file from the CustomText/ folder, you must do a /cmi reload.
If you don’t wish to give your players access to the ctext command, you can negate the permission in your permission manager, and then make a custom alias that does what you need it to do, including running the ctext file as a console command, on a player, on any of the pages.
For example, asConsole! cmi ctext mobs [playerName] 3, this will open page 3 of mobs.txt on the person who typed the custom alias command.
Legend:
<AutoAlias> - If the filename is meow, automatically creates a /meow command that shows this document
<AutoPage> - Turns <nextpage> automatically into page numbers
<Hidden> - Will not show when players do /cmi ctext [tab]
<ReqPermission> - Requires permission to be seen or used

<nextpage> - Cuts the text up, defining that the next page starts
<pageLabel:{#hex}text> - Instead of default Next, it shows Text, hex colors are possibleCustom Text files are great if you wish to create your own welcome /motd, /help command, paginated /rules information, or custom info pages for features like /jobs help, or /mcmmo help, or /skyblock help.